I’ve been running infrastructure at home for longer than I probably should admit. It started back in the early 2000s with something straightforward: I needed somewhere to keep my media. Videos, sure, but mostly an extensive photo collection that was already getting out of hand. Cloud storage was either non-existent or laughably small back then, so a home server made sense.
The setup stayed pretty static for years until maybe six or seven years ago when home automation hardware finally got interesting. I’m talking about actual usable stuff, not the traditional automation systems like KNX or DALI that required dedicated infrastructure and a second mortgage. Suddenly you could automate things without rewiring your entire house or calling in specialists. That opened up a whole new reason to have local infrastructure.
Then came the privacy thing. I got increasingly uncomfortable with how much of my data I was handing over for convenience. It wasn’t some dramatic revelation, more like a slow realization that I’d rather not trust every service provider with everything. So I started this gradual process of de-cloudification, pulling things back local, favoring open standards when I could find them.
Now, I need to be honest here: self-hosting isn’t free. People talk about escaping subscription hell, and I get it, we’re all being squeezed but, running your own infrastructure has costs too. There’s the electricity bill, which adds up more than you’d think, and there’s the time and knowledge needed to keep things running. Servers don’t maintain themselves. It’s always a trade-off between convenience, privacy, cost, and control.
All that said, I wanted to share what I’m actually running these days. Not a complete tutorial or a definitive guide, just the applications I’ve settled on and why I picked each one. Maybe it’ll be useful if you’re thinking about similar choices, or maybe it’s just interesting to see what someone else’s setup looks like after years of iteration.
Homeassistant
When you start thinking about automating a house, the first real exercise isn’t browsing product catalogs - it’s thinking about your actual lifestyle and what would genuinely be useful to automate. Just deploying a big-bang of features in an existing house without specific conditions isn’t wise. You want something cheap, reliable, and flexible that lets you grow gradually. Figure out what annoys you first, then solve for that.
For me, most of my requirements fell into four segments: (1) lights, (2) garage doors and external gates, (3) energy monitoring, and (4) appliance control. Pretty basic stuff, but covering those well makes a real difference in day-to-day life.
The company that became a game changer for me was Shelly. They make tiny automation devices that actually fit inside the walls, right in the electrical connection box where your light switches are. They join your WiFi network and just work. This approach let me tackle the first segment (lighting) pretty comfortably. The only requirement is decent WiFi coverage throughout the house. And because the devices are so small, and all four of my segments have one thing in common—there’s already power at those spots—it’s pretty simple to use the same devices across all of them.

Shelly provides an app to control everything, but I was looking for something more than a single-vendor solution. I wanted a platform that would let me expand and include other brands as they became available, without getting locked into one ecosystem.

By far, the best platform for reliably integrating multiple vendors and deploying serious control with a great interface is Home Assistant. It’s open source, actively maintained, and supports an absurd number of devices and services. That’s where I landed, and it’s been the backbone of everything since.
These days, I’ve moved beyond just Shelly. I also run a Zigbee network in parallel with several full-mesh devices. It’s out of scope for this post to dig into why, but just to give you the idea: WiFi isn’t a bulletproof solution in a large house with indoor and outdoor use cases. Covering an apartment completely is easy. More complex environments require other considerations. Maybe I’ll write about that separately.
Right now, I’ve got Home Assistant integrating heat pumps, CCTV cameras, gates, garage doors, pool pumps, irrigation systems, house ventilation, humidity and temperature sensors, and of course all the lighting. It’s become the central nervous system for the house.
One of the nice things about Home Assistant is how versatile the deployment options are. If you don’t have a home server like I do, you can grab one of their small plug-and-play boxes, draws maybe 3-5 watts and just works. Or you can install it on a Raspberry Pi if you’ve got one lying around. There’s flexibility depending on what you already have or what you’re willing to run.
Immich
For photo and video storage, my main requirement was pretty straightforward but non-negotiable: I needed to keep my photos and home videos in a simple directory structure on disk, organized by year and month. Year/Month. That’s it. No proprietary formats, no vendor lock-in, no dependency on any specific software to access my own files.
This was super critical for me. I wanted to maintain a simple ontology on disk that would let me browse the whole media archive without needing any program or solution. If the software I’m using today disappears tomorrow, or if I want to switch platforms, or if I just need to grab something quickly from the file system, I can. The photos or videos are just there, in folders, like they should be.
What I was looking for was a system where indexing, face recognition, and metadata generation were treated as add-ons, layers on top of the raw files, not replacements for them. The files themselves should remain untouched and accessible. Any “smart” features should enhance the experience without fundamentally changing how the data is stored.
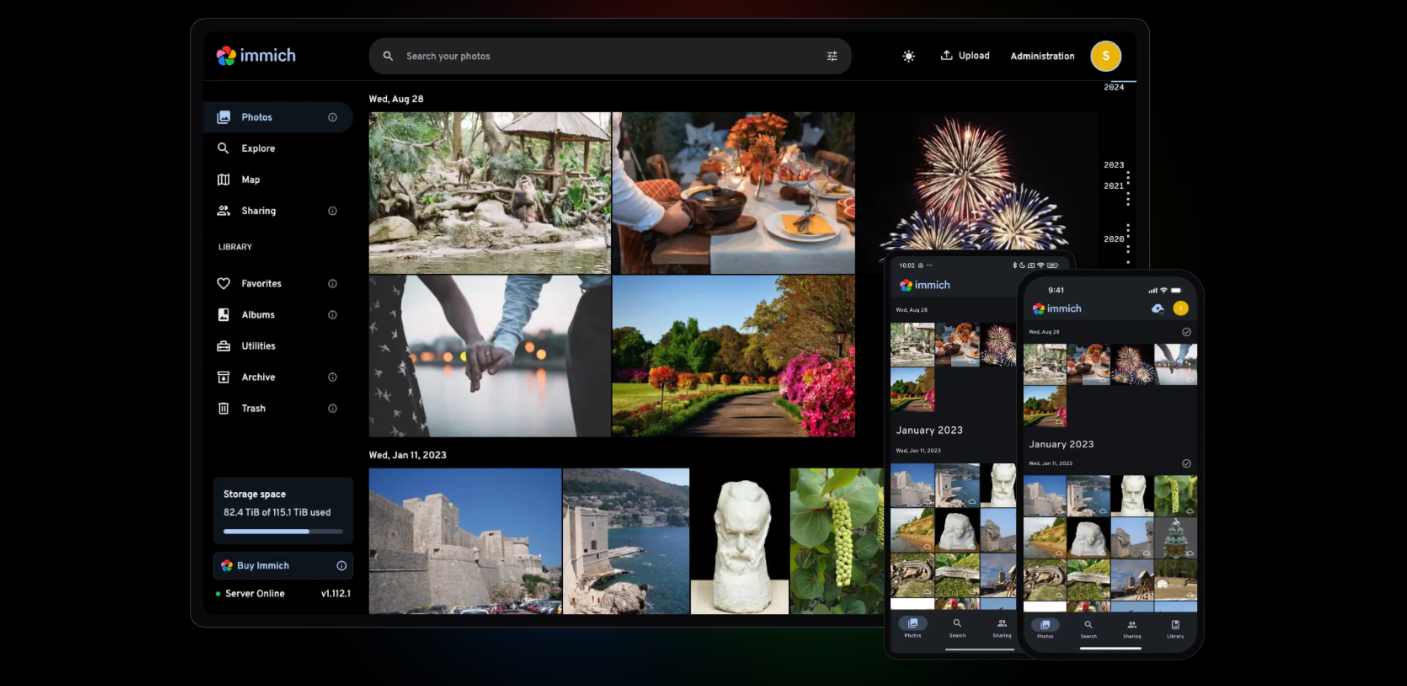
Immich solved this for me. It’s an open-source photo management solution that respects this principle. You point it at your existing directories, and it indexes everything without moving or converting your files. It provides a clean web interface, mobile apps, automatic backups from your phone, face recognition, object detection, and search - all while leaving your original files exactly where they are.
The face recognition works surprisingly well. It clusters faces automatically, and you can label people to make searching easier. Object detection lets you search for things like “beach” or “dog” and actually find relevant photos. But none of this requires you to hand over your media to a proprietary system or cloud service. It all runs locally, on your own hardware.
Right now, I’ve got +30 years of photos and videos indexed - everything from the 1980s digital scans forward - and the whole archive is still just sitting in those simple Year/Month directories. If Immich disappeared tomorrow, I’d lose the fancy search features, but I wouldn’t lose access to my photos.
Like HomeAssistant, Immich is flexible in how you deploy it. You can run it on a dedicated NAS server (which is what I do), or even on a Raspberry Pi if you’re not dealing with massive volumes. It uses Docker, so setup is reasonably straightforward if you’re comfortable with that. The resource requirements scale with how many photos you’re managing and whether you’re using the machine learning features, but it’s not particularly demanding for most home use cases.
Obsidian
For note-taking and personal knowledge management, I went through the usual progression - Evernote, Apple Notes, Notion. Each had its strengths, but at some point I realized this is really private information. My notes, my thoughts, my research, my work. I wasn’t comfortable having everything locked in a specific data format controlled by some company that could disappear, pivot, or just decide to sunset the product.
I needed something that could work for several years to come - hopefully decades - and resist time by using open standards. Not a proprietary database. Not a cloud service that might not exist in five years. Just files I could actually own and control.
Markdown turned out to be the perfect choice. It’s plain text with simple formatting syntax. The files just live on disk, as they should be. You can open them with any text editor. You can version control them with Git. You can sync them however you want. They’re yours.
Like with my media archive, I wanted metadata and fancy features to exist as a different layer - add-ons that enhance the experience without fundamentally changing how the data is stored. Tagging, backlinks, graphs, plugins - all of that should be optional. If I need to walk away from whatever platform I’m using, I should still be in control of my data. Plain text files on disk.
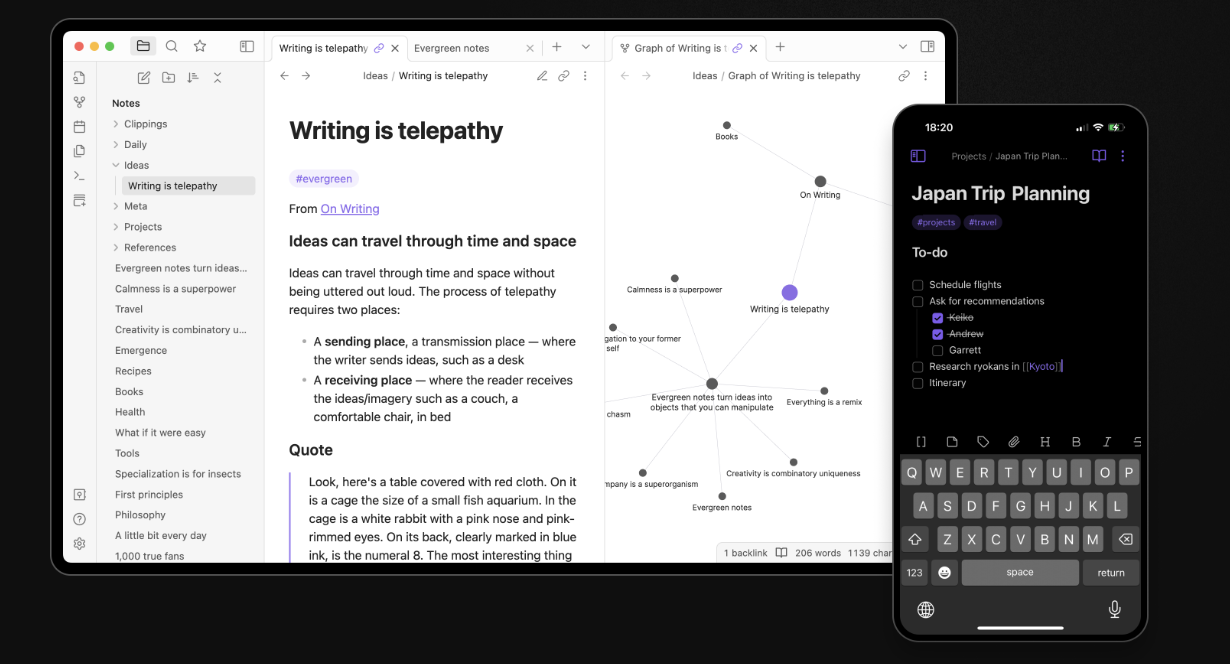
That’s when I discovered Obsidian. It’s a markdown editor and knowledge management system that works entirely with local files. You point it at a folder (they call it a “vault”) and it treats every markdown file in there as part of your knowledge base. It adds features like bidirectional linking, a graph view to see connections between notes, tags, search, and a massive plugin ecosystem. But underneath all of that, it’s still just markdown files sitting in a directory structure you control.
The plugin community is incredibly active. There are plugins for everything: task management, daily notes, calendars, integration with other tools, templates, you name it. But the core principle remains: your data is portable. If Obsidian disappeared tomorrow, you’d lose the interface and the plugins, but you’d still have all your notes in a format you can read and use anywhere.
Now with AI coming into the picture, having your information in an accessible format becomes even more important. You can run local LLMs against your notes, build custom search tools, generate summaries, find connections—all because your data isn’t trapped in some proprietary format. It’s just text. You can pipe it into whatever tools make sense for you.
I’ve got years of notes in there now - technical documentation, project planning, research, personal stuff. It all syncs between machines using whatever method I choose (I use icloud across all my devices). The whole system is fast, flexible, and I actually trust it to stick around because even if the software changes, the data format won’t.
Like Home Assistant and Immich, Obsidian is flexible in how you use it. The core app is free, there’s a paid sync service if you want their hosted solution, and the whole thing runs locally on whatever platform you’re on (window$, Mac, Linux, mobile). The resource requirements are minimal. It’s just text files, after all.
Paperless
For document management - bills, receipts, manuals, contracts, all that paper stuff - I went through the same realization I had with notes and photos. This is important personal information. Financial records, legal documents, warranties, medical paperwork. I didn’t want it sitting in filing cabinets where it’s hard to find and vulnerable to damage, but I also didn’t want to hand it all over to some cloud service that might disappear or change their pricing model in a few years.
I needed something that would let me digitize everything and make it searchable, but - like with everything else - I wanted to maintain control over the actual files. The data format needed to be open and future-proof. No proprietary databases. No vendor lock-in.
PDFs are the obvious choice here. They’re a standard format that will be readable for decades. Every operating system can handle them. You can open them with dozens of different programs. They’re yours.
Like with my media archive and notes, I wanted the smart features (OCR, tagging, categorization, search) to exist as a layer on top of the files, not as a replacement for them. If I need to walk away from whatever platform I’m using, I should still be in full control of my data. Just PDFs sitting in directories on disk. Simple.
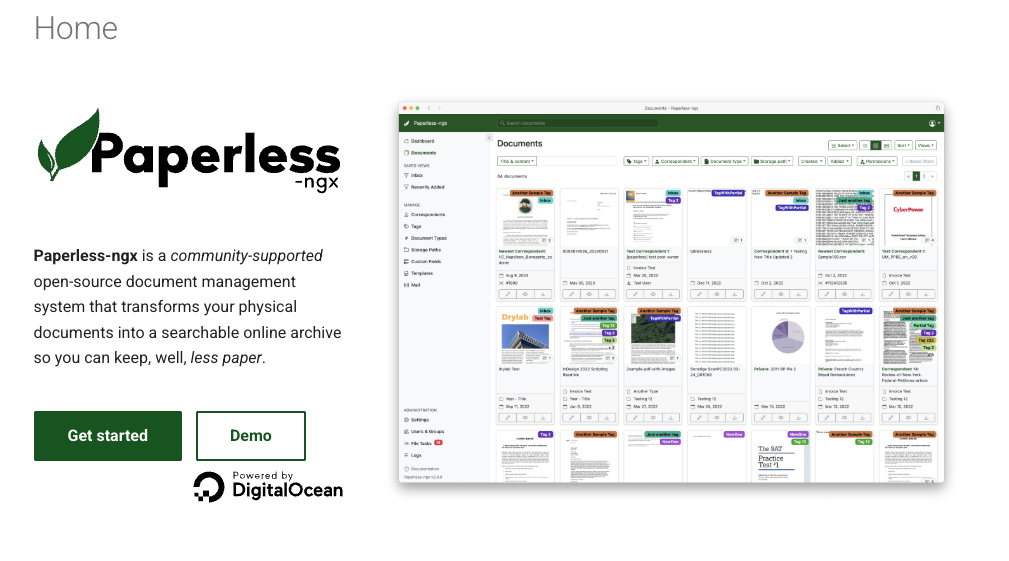
I ended up with Paperless-ngx. It’s an open-source document management system that scans or imports PDFs, runs OCR to make everything searchable, lets you tag and categorize documents, and provides a clean web interface to find what you need. But underneath all of that, it’s still just PDF files stored in a standard directory structure you control.
The OCR works really well, it can handle multiple languages and makes even old scanned receipts fully text-searchable. You can set up automatic tagging rules, create document types, assign correspondents (like “power company” or “bank”), and add dates. There’s even support for automatically parsing certain document types to extract useful metadata. What’s particularly clever is that all this meta information (tags, OCR text, custom fields) can be embedded directly into the PDF itself without you losing the main document image. Paperless does this by default. So even if you take the PDF out of the system, all that metadata travels with it. The file remains self-contained and useful.
I also maintain my own ontology on disk - Year/Month directories with filenames in the format “filename+tags.pdf” - to gain resilience through time. Even without Paperless running, I can navigate to any year and month and find documents by their descriptive names and embedded tags. It’s a backup layer of organization that doesn’t depend on any software.
The workflow is straightforward. You can scan documents directly into the system, upload files through the web interface, email documents to a specific address, or just drop files into a watched folder. Paperless picks them up, OCRs them, applies any matching rules you’ve set up, and makes them searchable. There’s also a companion mobile app that lets you use your phone to digitize documents easily and fast - snap a photo of a receipt or bill, and it uploads directly to Paperless for processing. I’ve got years of documents in there now: tax returns, insurance policies, appliance manuals, medical records; and I can find anything in seconds.
Now with AI coming into the picture, having your documents in an accessible format becomes even more valuable. You could run local LLMs to summarize contracts, extract information across multiple documents, answer questions about your records - all because your data isn’t trapped in some proprietary system. It’s just PDFs with searchable text.
Like the other systems I’ve described, if Paperless disappeared tomorrow, I’d lose the nice interface and the automatic tagging, but I’d still have all my documents as standard PDF files with embedded metadata and a clear directory structure.
Paperless-ngx is flexible in deployment. You can run it in Docker (which is what I do), on a NAS, or on a dedicated machine. It integrates well with the mobile app and makes it trivial to capture documents on the go. The resource requirements are minimum, just the space to store the PDFs.
The whole thing just works. I’ve finally gone mostly paperless at home, and I actually trust the system because I’m not dependent on it. The files are mine, in a format that will outlast any software.
Frigate NVR
When you decide to put cameras on your property, the initial focus tends to be on choosing the right brand and getting good image quality. Resolution, night vision, field of view, all important specs. But the real challenge, the thing that matters in the long run, is how reliably you can go through footage to recover a specific moment, and how well the system can detect and catalog events for review or notification. Finding that one clip from three weeks ago shouldn’t require scrolling through hours of video.
When I started considering CCTV, I wasn’t aware of that distinction. I was much more focused on the capability to acquire good footage, which is important, of course, but it’s only half of the problem.
I went with Reolink cameras. They’re cheap, the image quality is solid, and they work fine as hardware. But the vendor’s NVR software was a joke. Typical Chinese UI/UX, confusing menus, clunky timeline navigation, unreliable search. It worked, technically, but using it was frustrating enough that I barely bothered reviewing footage unless I really needed to.
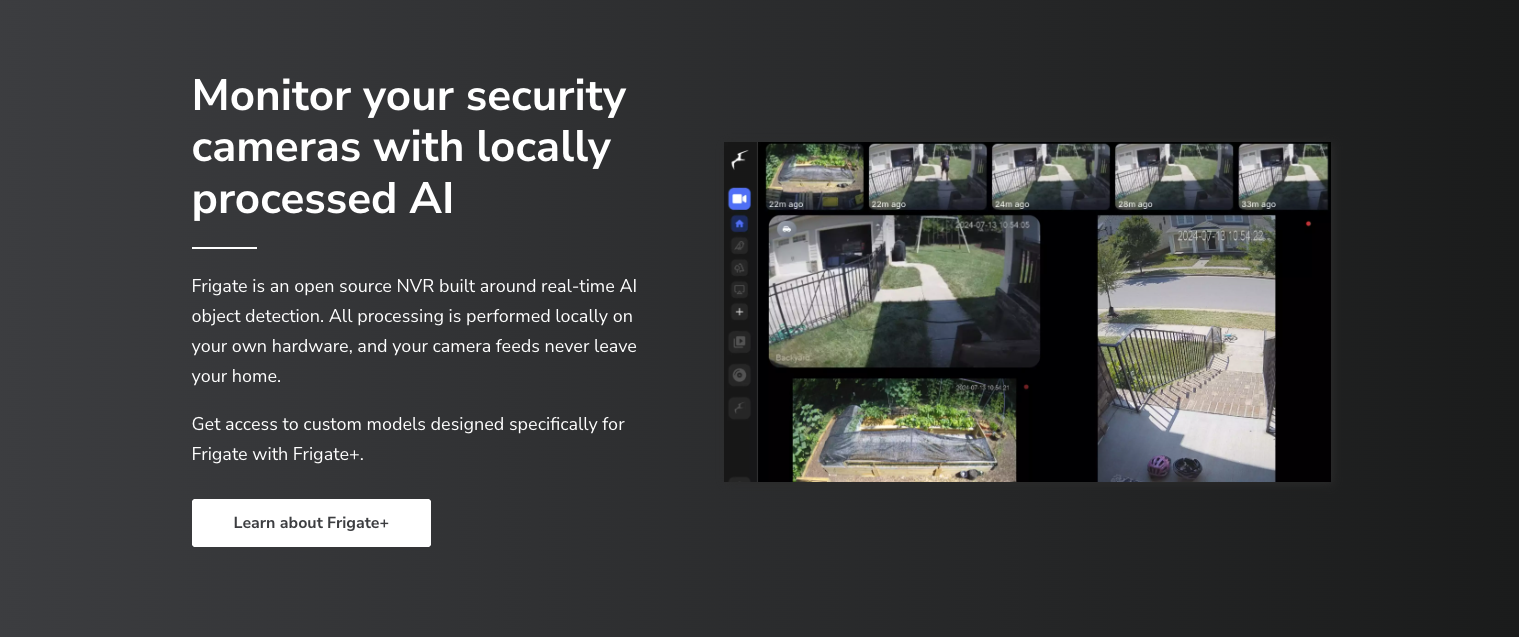
I switched to Frigate. It’s an open-source NVR built around real-time object detection using AI. It integrates with Home Assistant, supports a wide range of camera brands (as long as they provide an RTSP stream), and has matured a lot in the last few years.
Now it can reliably give you actual search and browsing capabilities - filtering by detected objects, people, vehicles, zones, time ranges. You can set up alerts for specific events, review snapshots instead of scrubbing through video, and actually find what you’re looking for without wanting to throw your computer out the window.
One thing to know: Frigate needs decent computing power. It won’t work well on a simple Raspberry Pi. The AI object detection happens in real-time, processing multiple camera streams simultaneously, and that requires proper CPU or ideally a Coral TPU for hardware acceleration. If you’re planning to run Frigate, factor in either a more capable server or dedicated hardware for the inference work. It’s not prohibitively expensive, but it’s a real consideration when planning your setup.
It runs locally, uses your existing cameras, and stores footage however you want (on your server, on a NAS, wherever). The AI detection happens in real time, so you’re not waiting for processing after the fact.
That said, if I were starting today, I’d seriously consider a UNIFI integrated solution. They make great cameras, the UI/UX is genuinely excellent, and they provide a scalable NVR that just works. It’s a turnkey solution with cameras, NVR, software and mobile apps, all from one vendor, all designed to work together seamlessly. You pay more upfront, but you skip the DIY headaches and get a polished experience. Sometimes that’s worth it.
karakeep
Since the internet’s early days, I’ve been trying to find ways to preserve some kind of browser history - not the full log of every site I visit, but the interesting things I come across. Articles I want to remember, useful resources, references for projects, things that made me think. Browser bookmarks were never quite good enough. They’re disorganized, they break when you switch browsers, and they’re basically just a list of links with no context.
What I really needed was a way to save not just the URL, but some way to classify and search through everything later. Something that would let me rediscover things months or years later without having to remember exactly where I saw it or what it was called.
I tried various solutions over the years (Pocket, Instapaper, browser bookmark sync), even just saving articles as PDFs. In the last few years, my approach was to use an Obsidian bookmarklet to save URLs directly to Obsidian. By doing that, I was also creating a markdown document in Obsidian with the content - again, in an open format. It worked reasonably well and fit with my existing note-taking system, but it wasn’t quite purpose-built for bookmark management.
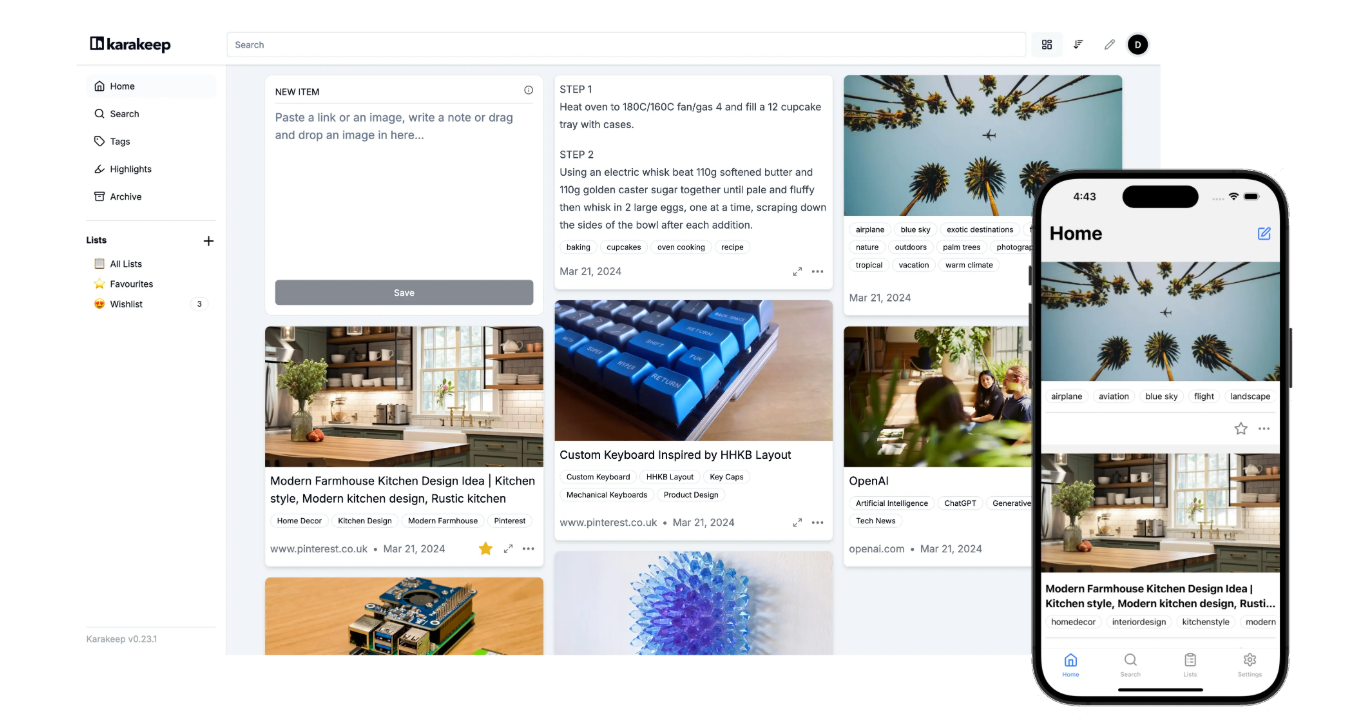
That’s when I found Karakeep. It’s a bookmark management tool that lets you save links, tag them, organize them into collections, and actually find them later when you need them. The interface is clean, the search works well, and it handles the basic problem of “I saw something interesting three months ago and now I can’t find it.”
Like with the other tools I’ve described, what matters is having a system you’ll actually use and that you can trust to stick around. Whether that’s self-hosted or a reliable service depends on your priorities, but the key is getting those interesting finds out of your browser’s black hole of bookmarks and into something searchable and organized.
I’m not moving years of bookmarks yet, I’m just trying it out. But I see some potential in this app. The workflow feels right, and it seems like it might actually solve the problem without adding friction. I’ll have a clearer idea next year whether it sticks or if I end up back in Obsidian for everything.
Grafana & InfluxDB
For monitoring and visualizing all the data my home automation generates, I ended up with the classic combination of InfluxDB and Grafana. InfluxDB is a time-series database - basically designed for storing sensor readings, measurements, anything that changes over time. Grafana is a visualization platform that lets you build dashboards and graphs from that data.
All my full-resolution sensor data generated by Home Assistant gets forwarded to InfluxDB. Temperature readings, humidity levels, power consumption, motion detection events, door states, everything. Home Assistant keeps its own database for recent history, but InfluxDB is where I’m storing the long-term data at full granularity. No downsampling, no aggregation, just the raw stream of measurements.
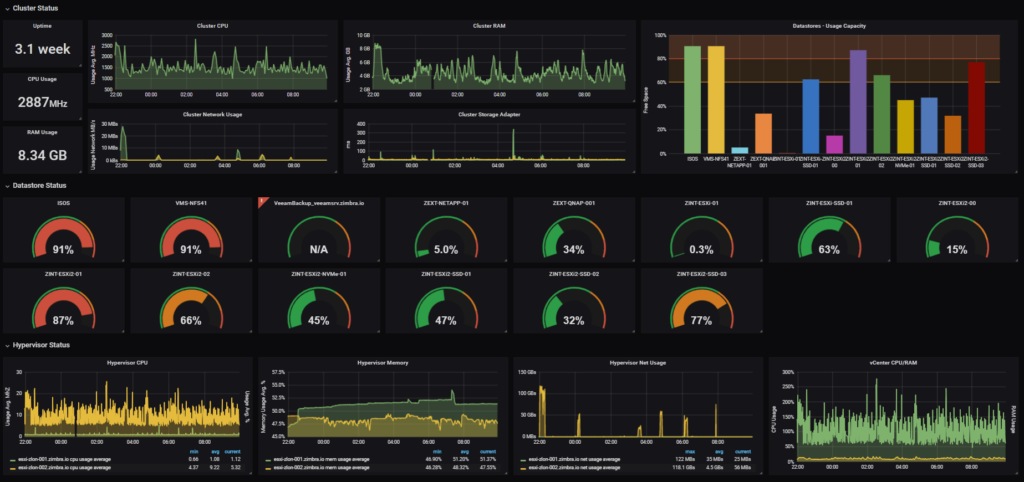
Grafana lets me visualize all of this however I want. I can build dashboards showing energy consumption over weeks or months, track temperature patterns across seasons, see when specific devices are most active, correlate different sensor, basically anything you can imagine graphing. The interface is powerful and flexible, and you can drill down from high-level overviews to specific time periods pretty easily.
Is it useful? To be honest, I don’t know yet 😊
Right now I browse the data just because I can; it’s interesting to see patterns, to notice that the pool pump runs more in summer (obviously), or that the garage door gets opened most frequently around 8am and 6pm. But I haven’t found a compelling use case that justifies the setup beyond “it’s cool to look at.”
Maybe I’ll discover something useful like catching a failing device before it dies completely, optimizing energy usage based on actual data, understanding why certain automations trigger more than expected. Or maybe it’ll just remain a curiosity, a way to satisfy the impulse to measure things. I’ll have a clearer idea in a year or two whether this is genuinely valuable or just technically interesting.
Like the other systems I’ve described, both InfluxDB and Grafana are open source and run locally. The data is mine, stored in a standard time-series format. If I decide this whole experiment isn’t worth it, I can shut it down without losing anything important. For now, though, it’s running alongside everything else, quietly collecting measurements, waiting to prove itself useful—or not.
Pingvin
For sharing files with people outside my home network (friends and family) the options have always been a bit awkward. You can email files if they’re small enough, use Dropbox or Google Drive links if you trust cloud services, or try to set up your own FTP server if you want to relive the 1990s. None of these felt quite right.
Email attachments have size limits and clog up inboxes. Cloud services work fine, but you’re uploading your files to someone else’s infrastructure, they often require recipients to have accounts, and you lose control over how long those links stay active. Setting up proper file sharing on your own server usually means dealing with authentication, permissions, and complexity you don’t really need for “here’s that document you asked for.”
What I wanted was something simple: a way to upload a file, get a link, send it to someone, and have it work without friction. Bonus points if the file automatically expires after a set time or number of downloads, and if I’m not dependent on a third-party service.
That’s when I found Pingvin Share. It’s a self-hosted file sharing platform, basically your own private WeTransfer. You upload a file, set an expiration time or download limit, get a shareable link, and send it. The recipient clicks the link, downloads the file, no account needed. Simple.

The interface is clean and straightforward. You can set files to expire after a certain time period, after a specific number of downloads, or both. You can password-protect shares if you want an extra layer of security. There’s support for uploading multiple files in a single share, and you can see basic statistics on what’s been downloaded.
Like everything else I’ve described, it runs locally on your own infrastructure. The files stay on your server, not someone else’s. You control the retention policies, the storage limits, everything. If you want to share a 2GB or 200GB video file with someone, you can, no arbitrary size limits imposed by a third party.
I use it occasionally when I need to send something too large for email or when I want more control over the sharing process than a cloud service provides. It’s not something I use daily, but when I need it, it’s there and it works exactly how I want it to.
Deployment is the usual Docker setup. Resource requirements are minimal, it’s basically just web hosting plus temporary file storage. You can put it behind a reverse proxy with HTTPS, restrict access if needed, and integrate it into your existing infrastructure pretty easily.
Is it essential? No. Could I just use Google Drive or Dropbox for this? Sure. But it’s nice having the option to share files on my own terms, from my own server, without depending on external services or worrying about upload limits and privacy policies. It’s one more piece of the puzzle that keeps my data under my control.
NGINX Proxy manager
When you’re running multiple services on a home server (Home Assistant, Immich, Paperless, Frigate, all of these things) you need a way to expose them securely, both for access from outside your home network and just for basic organization. You don’t want to remember port numbers for everything, and you definitely don’t want to be accessing services over plain HTTP when you’re dealing with personal data.
What you need is a reverse proxy that handles HTTPS certificates and routes requests to the right service based on the domain name. Traditionally, this meant configuring Nginx directly - editing config files, managing SSL certificates manually, dealing with Let’s Encrypt renewals. It works, but it’s tedious and error-prone if you’re not doing it regularly.
Nginx Proxy Manager is basically a web UI wrapper around Nginx that makes the whole process straightforward. You add a proxy host, point it at the service you want to expose (like immich.yourdomain.com → your Immich instance on port 2283), click a button to enable SSL, and it automatically handles the Let’s Encrypt certificate request and renewal. That’s it.
The interface is clean and intuitive. You can see all your proxy hosts at a glance, manage SSL certificates, set up access lists for basic authentication, configure custom Nginx rules if you need them. But for most use cases, you just fill in a few fields and everything works. No editing config files, no remembering Nginx syntax, no manual certificate management.
I’ve got it routing traffic to all my self-hosted services - each one gets its own subdomain, all with valid HTTPS certificates that renew automatically. It handles the complexity so I don’t have to think about it. When I spin up a new service, adding it to the proxy takes maybe two minutes.
That said, there’s an even simpler option now: Cloudflare Tunnel.
Instead of exposing your home IP address and managing port forwarding on your router, you install a lightweight daemon on your server that creates an outbound tunnel to Cloudflare. They handle the routing, the SSL certificates, the DDoS protection, everything. You just configure which services you want accessible and what domains to use. No ports to forward, no firewall rules to manage, no exposed IP address.
It’s genuinely easier to set up than Nginx Proxy Manager, and it comes with built-in security benefits. The tradeoff is you’re routing traffic through Cloudflare’s infrastructure instead of directly to your server, and you’re dependent on their service. But for most home use cases, that’s a perfectly reasonable tradeoff for the simplicity.
I still use Nginx Proxy Manager for local network access and for services I want full control over, but Cloudflare Tunnel is worth considering if you just want things to work without thinking about the networking details.
Cloudflare DDNS
When you’re self-hosting services at home, one annoying reality is that most residential internet connections have dynamic IP addresses. Your ISP can change your public IP at any time after a router reboot, a service outage, or just randomly. If you’re trying to reach your services from outside using a domain name, that domain needs to point to your current IP address. When the IP changes, things break until you update it.
The traditional solution is dynamic DNS, a service that automatically updates your DNS records when your IP changes. There are plenty of paid DDNS services, but if you’re already using Cloudflare for DNS (which is free and works well), you can just run a simple daemon that monitors your IP and updates Cloudflare’s DNS records automatically when it changes.
I use a lightweight Docker container that checks my public IP every few minutes and updates the A record in Cloudflare if it’s changed. It runs quietly in the background, uses Cloudflare’s API, and just works. No manual updates, no broken services when the IP changes, no additional service to pay for.
It’s one of those small pieces of infrastructure that isn’t exciting but prevents annoying problems. You set it up once, give it your Cloudflare API token and the domains you want to keep updated, and then forget about it. Just another container running alongside everything else, making sure things stay accessible.
Pihole + Technitium
For blocking ads and tracking across your entire network, Pi-hole has been the go-to solution for years. It’s a DNS server that runs on your local network and blocks requests to known advertising and tracking domains. Instead of installing ad blockers on every device (phones, tablets, computers, smart TVs) you just point all your devices to use Pi-hole as their DNS server, and ads disappear network-wide.

The concept is elegant. When a device tries to load an ad from doubleclick.net or some tracking script from facebook.com, Pi-hole intercepts the DNS request and returns nothing. The ad never loads. It works on devices where you can’t install browser extensions, like smart TVs and mobile apps. It speeds up browsing by not loading all that tracking garbage. And you get detailed statistics on what’s being blocked and which devices are requesting what.
Setting it up is straightforward, traditionally on a Raspberry Pi (hence the name), but it runs fine in Docker or on any Linux system. You configure your router to hand out Pi-hole’s IP as the DNS server via DHCP, and everything on your network automatically uses it. The web interface shows you real-time queries, top blocked domains, which devices are chattiest, all of that. It works well and has a massive community behind it. The blocklists are extensive and regularly updated. For most people, it’s probably more than enough.
That said, I’ve been using Technitium DNS Server alongside Pi-hole, and honestly, I’m enjoying it more. It’s a full-featured DNS server with ad-blocking built in, but it also handles more advanced DNS features - conditional forwarding, DNS-over-HTTPS, DNS-over-TLS and better support for local network resolution. The interface feels more modern and the configuration options are more granular. I find myself reaching for Technitium more often these days, though I keep Pi-hole running out of habit and because it still works fine.
Hello Jellyfin, bye-bye Plex
For streaming my media library (all those videos and photos I’ve been storing for years) I was a faithful Plex user for a long time. Plex worked well, had good apps for every platform and just made it easy to access my content from anywhere. It was the obvious choice.
But in recent years, Plex’s commercial policy started rubbing me the wrong way. They kept pushing their own streaming content like TV shows and movies from their partners, mixed in with my personal library. The interface got cluttered with stuff I didn’t care about. Features I wanted, like mobile sync for offline viewing, were locked behind a Plex Pass subscription. The whole thing started feeling less like software for managing my media and more like a platform trying to monetise my attention.
That’s when I switched to Jellyfin. It’s open source, completely free, and focused entirely on your own media. No ads, no promoted content, no upselling. Just your library, organized and accessible. The client can be installed on smart TVs, streaming devices, phones, whatever you need. It’s fast, the interface is clean, and it handles live transcoding without issues.
The key feature for me is mobile download for offline viewing, essential for long flights. You can sync entire shows or movies to your phone, watch them without internet, and it just works. In Plex, that’s a paid feature behind Plex Pass. In Jellyfin, it’s just… there. Standard. Free.
The migration from Plex was straightforward, just point Jellyfin at my existing media directories, let it scan and organize everything, install the apps on my devices, and that was it. No regrets. It does what I need without trying to be anything else.
Portainer
When you’re running a dozen or more Docker containers on a home server (Home Assistant, Immich, Paperless, Jellyfin, all of these services) managing them from the command line gets tedious fast. You can do it, sure. docker ps, docker logs, docker-compose up -d, it all works. But when you just want to quickly check if a container is running, restart something that’s misbehaving, or see resource usage at a glance, typing commands gets old.
That’s where Portainer comes in. It’s a web-based management interface for Docker that makes container management actually pleasant. You get a dashboard showing all your containers, their status, resource usage, and logs. Want to restart a service? Click a button. Need to check logs for errors? Open them in the browser. Want to see which containers are eating CPU or memory? It’s right there.
It’s not just about convenience, it’s about lowering the friction for maintenance. When checking on your services requires SSH-ing into the server and remembering Docker commands, you do it less often. When you can just open a browser tab and see everything at a glance, you actually keep an eye on things. You notice problems faster.
Portainer also makes it easier to manage multiple Docker Compose stacks, update container images, manage volumes and networks, and even deploy new containers without touching the command line. Beyond Docker, it also manages Kubernetes clusters if you need that level of orchestration. They’ve even released a new open-source project called KubeSolo - an ultra-lightweight, single-node Kubernetes distribution designed specifically for extremely resource-constrained edge devices. It’s a stripped-down fork of K3s that runs in under 200MB of RAM, targeting IoT devices, industrial controllers, and embedded systems where even K3s is too heavy. Not something most home labs need, but it shows where Portainer is heading: managing containers everywhere, from servers down to tiny edge devices.
I’ve got it running on my home server, and it’s become one of those tools I use constantly without thinking about it. It’s the first thing I open when something seems off or when I want to check on the infrastructure. Lightweight and it makes managing containers feel effortless.
Final thoughts
So that’s where things stand with my homelab setup right now.
It’s taken years to get here, starting with simple media storage, evolving through home automation, privacy concerns, and eventually landing on this collection of self-hosted services that actually work together. None of it happened overnight, and plenty of it involved trial and error, dead ends, and solutions that seemed great until they weren’t.
The common thread through all of this has been control and portability. I wanted my data in formats I could access without depending on any specific software, I wanted systems I could trust to stick around because they’re based on open standards, and I wanted the flexibility to change direction without losing everything. That’s worked out reasonably well, though it’s definitely required more effort than just paying for cloud subscriptions and calling it a day.
Is this approach for everyone? No.
Self-hosting has real costs like time, knowledge, electricity, maintenance. Check my previous article about how I made it.
But if you value privacy, want to learn how these systems actually work, or just don’t like the idea of your personal data living on someone else’s infrastructure, it’s a viable path. Start small, figure out what actually matters to you, and build from there. You don’t need to replicate anyone else’s setup, including mine.
Here’s to 2026. May your servers stay online, your backups actually work when you need them, and your curiosity about what’s possible keep you tinkering.